+86 512 68781993


The installation manual for butterfly valve pipelines
The installation manual for butterfly valve pipelines
1. Flange Welding and Cooling:
First, weld the flange to the pipeline and allow it to cool to ambient temperature before installing the valve onto the flange. Otherwise, the high temperature generated during welding may affect the performance of the elastic valve seat.
2. Flange Edge Preparation:
The edges of the welded flange must be machined smooth using a lathe to avoid damaging the elastic valve seat during valve installation. The flange surface must be completely undamaged and free from deformation. Remove all dirt, dust, and foreign objects to prevent liquid leakage at the valve and flange interface.
3. Cleaning the Flange and Pipeline:
Clean the inside of the flanges and pipeline to thoroughly remove welding spatter, peeling scale, and other debris.
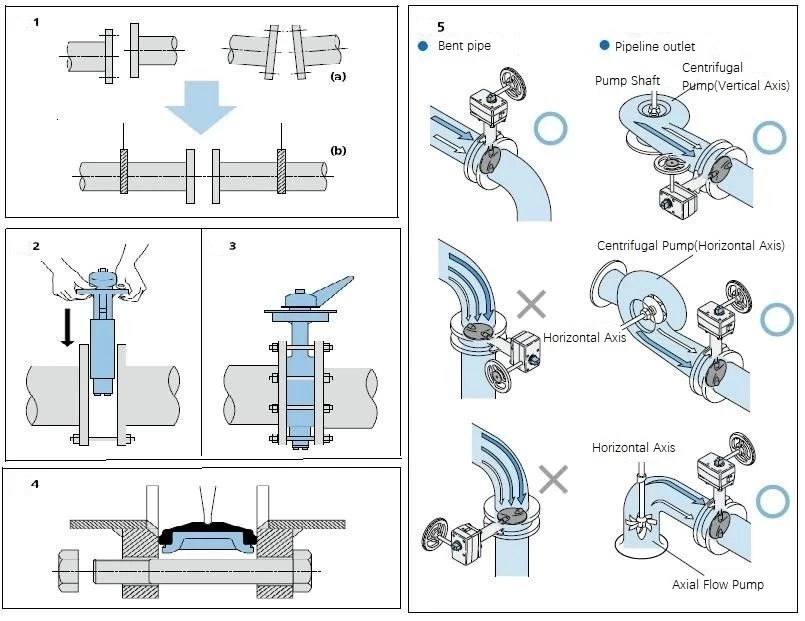
4. Pipeline Alignment:
When installing pipelines between valves, precise alignment of the upper and lower pipeline centers is crucial for smooth operation. The misalignment shown in Figure 1 should be avoided.
5. Valve Installation:
Position the support bolts beneath the pipeline at the same height and adjust the flange distance until the valve body sides are approximately 6-10 mm apart. Remember, the valve should only be opened up to 10° from the closed position at this stage.
6. Initial Bolt Installation:
Insert two bolts into the lower guide rods of the valve, and carefully install it, ensuring the flange surface does not damage the elastic valve seat (see Figure 2).
7. Top Bolt Installation:
Insert two additional bolts into the upper guide rods of the valve to ensure precise center alignment between the pipeline and the valve.
8. Valve Operation Check:
Open the double flange butterfly valve three times to check for smooth contact between the valve disc and the flange.
9. Bolt Tightening:
Remove the positioning bolts and tighten all bolts around the valve body alternately and diagonally (see Figures 3 and 4) until the flange contacts the valve body. Refer to the table below for the recommended torque values.
10. Actuator Installation Support:
Provide support for the valve when installing the actuator to prevent distortion of the valve neck and reduce friction between the valve and pipeline.
11. Avoid Step-on Damage:
Do not step on the valve neck or handwheel.
12. Correct Orientation for Large Valves:
Do not install DN350 or larger valves upside down.
13. Valve Location:
Do not install the butterfly valve directly onto check valves or pumps, as contact with the valve disc may cause damage.
14. Downstream Installation:
Do not install the valve downstream of elbows or reducers or calibrate the valve where flow velocity changes occur. If this is the case, it is recommended to install the valve at a distance approximately 10 times its nominal diameter away from such changes.
15. Flow and Pressure Considerations:
When installing the valve, consider which side of the valve disc will experience flow velocity and pressure during fluid transportation.