 +86 512 68781993


Planned maintenance of the valve
Planned maintenance of the valve
A valve is an accessory on equipment and pipelines, and its maintenance should be combined with the maintenance of equipment and pipelines.
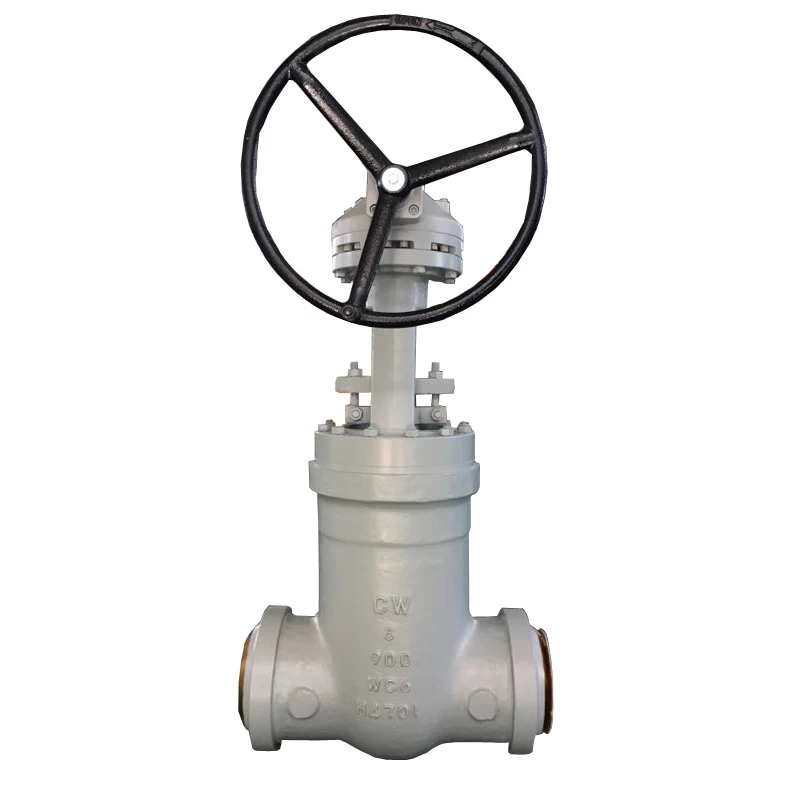
The oil refinery equipment maintenance and overhaul regulations stipulated by the Ministry of Raw Fuel Chemical Industry stipulate that the nominal pressure of the refinery is lower than PN16MPa and the medium temperature is lower than 550℃ for high, medium and low pressure valves for oil, steam, water and various gases. And some power plant pipeline installed with WC6 high temperature high pressure gate valve ,this kind valve also need to be repaired when it service long time. The repair content is divided into three categories: minor repair, medium repair, and overhaul.
The various repair items included are as follows:
· Minor repairs: clean the oil nipple and oil cup, replace the packing, clean the valve stem and its thread, remove the debris in the valve, tighten the replacement bolts, and equip the hand wheel.
· Medium repair: including minor repair items, disassembly and cleaning of parts, valve body repair, grinding seals, straightening valve stems, etc.
· Overhaul: including mid-repair items, replacement of valve stems, repair of brackets, replacement of springs and seals, etc.
Valves repaired indoors are generally medium and minor repairs, but they should also be disassembled for inspection and gasket replacement.
Valve maintenance under pressure
Repairing valves under pressure is a complex, dangerous, and highly technical task. In addition to being bold, cautious, cautious and decisive, maintenance valves under pressure should also have a strict scientific attitude. In particular, the plugging of explosive, highly toxic, high temperature, high pressure, radioactive and other media should be carried out in strict accordance with the pre-determined plan and relevant safety regulations.
When repairing the valve under pressure, the following matters should be noted:
1.During the maintenance process, strictly observe the relevant safety operation regulations such as fire prevention, anti-virus, and explosion-proof.
2.Before dealing with the defects of the pressurized valve, a treatment plan should be proposed, and the consent of the safety technician should be obtained and the cooperation of the operator should be obtained. The treatment of important parts must undergo joint research and go through procedures such as fire tickets and drug tickets in accordance with regulations before proceeding to deal with valve defects.
3.The work of dealing with defects should be performed by maintenance personnel with rich practical experience. It is not advisable to have too many on-site personnel and one or two dedicated guardians.
4.There should be careful safety measures to be able to cope with the worst. Maintenance personnel and on-site personnel must wear protective work clothes, shoes, hats, gloves and protective glasses in accordance with the protective measures for flammable, explosive, high temperature and high pressure, toxic, highly toxic, and strong corrosive media. Wear a gas mask when repairing toxic and highly toxic valves.
5.In the process of dealing with valve defects, safety baffles should be installed, and at the same time, they should be cautious and careful, observe while doing things, and proceed according to the prescribed plan.
6.Before tightening the threads, add kerosene to clean and penetrate the rusty threads to check whether the bolts and nuts are intact; rust loose liquid or a layer of graphite powder should also be added to lubricate the threads. When tightening the nut, do not tighten it forcefully to prevent the bolts and screws from breaking.
7.When welding the valve, follow the welding procedure. The metal should be prevented from overheating and deforming, resulting in new cracks. If a new leak occurs in the part that has been caulked, it is not advisable to caulk again to avoid expanding the leakage defect.
Valve assembly and disassembly
Screw connection assembly and disassembly
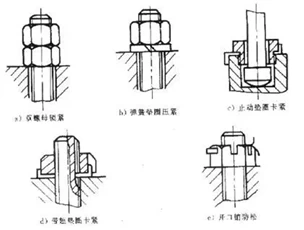
(1) Anti-loosening method of threaded connection
Nuts, spring washers, stop washers, split pins and other connectors are commonly used on valves to prevent the nuts from loosening. The connecting structure of the valve stem and the closing part often adopts the locking washer clamping method and the fin washer clamping method to prevent loosening, and the effect is better.
In addition, the methods used to prevent the valve from loosening include seam screw (riding screw) fixing method and point riveting method, both of which are used in occasions that are not often disassembled. The point riveting method is to rivet the thread of the nut and the bolt at two or more points with foreign punches, so that the threads are squeezed and deformed to prevent loosening. If the nut is loose with the above methods difficult to solve, the bonding method can be used.
(2) Identification of left-hand thread and right-hand thread
Correctly identifying whether the thread is left-handed or right-handed is the most basic knowledge of valve assembly and disassembly. So, how can we figure out whether the thread is left-handed or right-handed? It can be determined with the help of the internal or external thread on the valve. Under normal circumstances, they have a positive and negative thread structure to prevent the thread from loosening. Such as the threaded connection on the stem and stem nut: the tight ring on the stem nut is left-handed, the thread on the hand wheel is right-handed, and the trapezoidal thread of the stem nut is left-handed. In addition, the rising angle of the thread is that the thread rising to the left is called left-handed; otherwise, it is right-handed.

(3) Method of disassembling bolts
The method of disassembly and assembly of bolts is usually related to factors such as connection form, damage and degree of rust. The following focuses on the disassembly and assembly of stud bolts; the disassembly of rusty bolts and nuts; the disassembly method of broken bolts.
① Disassembly and assembly method of stud bolt
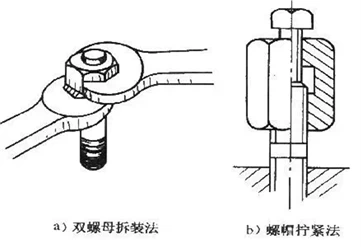
The method of disassembling and assembling stud bolts with double nuts in parallel. When the stud to be removed, the wrench to tighten the nut on the lower nut, the ejector force the rotation of the nut in a counterclockwise direction, the bolt will be screwed out. If the stud bolt is reverse-threaded (left-handed), tighten the nut with the upper wrench, and tighten the nut clockwise out of the bolt with the lower wrench; when the stud bolt is to be assembled to the valve, the lower wrench presses the lower nut and the upper The stud bolt can be tightened on the valve body by rotating the upper nut with the wrench in a clockwise direction. If the stud is reverse-threaded, the lower wrench is pressed to tighten the lower nut, and the upper wrench rotates the upper nut counterclockwise to tighten the stud.
Another method of tightening stud bolts is to use a special nut with a screw on it to tighten the stud bolt. The internal thread of the nut has the same specification as the stud bolt. When used, screw the stud bolt into the nut and tighten the screw, and then turn the nut to turn the stud bolt.
② Removal method of rusty bolts and nuts
Before disassembling the rusty and corroded bolts and nuts, they should be soaked with kerosene and the direction of the screw should be figured out. Then slowly loosen about 1/4 and return to the original position; in this way, the bolts can be gradually unscrewed by repeated advance and retreat. You can also use a hand hammer to knock the bolts and nuts around to loosen the threads, and then loosen the bolts and nuts (but do not break the threads during the knocking process). Nuts that are difficult to disassemble by tapping can be heated by a torch or an oxy-acetylene flame to make the nut expand by heat and quickly unscrew the nut. For stud bolts that are difficult to disassemble, after soaking with kerosene, they can be screwed out at the middle polished rod position with pipe pliers.
③ Removal method of broken bolt
The bolt breaks in the screw hole, which is troublesome during disassembly.
Several methods of screwing out broken head bolts.
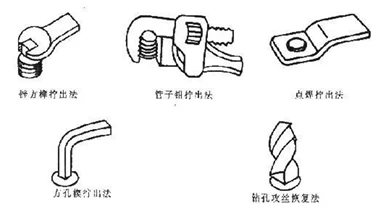
· The method of screwing out the square tenon of the file and the method of screwing out of the pipe wrench is suitable for the broken head bolt with a height of 5mm or more outside the screw hole;
· The spot welding screw-out method is suitable for the condition that the broken head bolt is outside the screw hole or the broken head bolt and the screw hole are flat. It is made of flat steel drilled with a hole smaller than the screw hole, and the hole is filled out after spot welding. ;
· The square hole wedge unscrewing method is suitable for bolts that are broken in the screw hole. The method is to drill a small hole in the middle of the bolt, tap the small hole with a square hole taper, and then unscrew it;
· The drilling and tapping recovery method is suitable for
the situation where the bolt cannot be taken out. It is made by first leveling
the cross section of the bolt, after proofing, using a drill bit smaller than
the inner diameter of the thread, and finally tapping the original thread.
Before using the above method of screwing out the broken bolt, some conventional measures should be taken, such as kerosene soaking, removing the surface oil stain and rust (this is especially important for the screwing method of spot welding, otherwise the welding is not strong). If necessary, heat around the bolts and screw out the bolts under thermoplastic conditions. Chemical corrosion methods can also be used to unscrew broken bolts. Properly clean the rusty and corroded bolts and screw holes, which will speed up the unscrewing of broken bolts (after screwing out the bolts, water should be used to rinse the screw holes to avoid residual chemical corrosion. Valve).
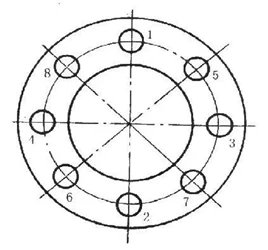
(4) The sequence of tightening bolts
When the valve is assembled, the tightening degree and sequence of the bolts have a direct impact on the assembly quality. It is easier to tighten the general bolts, as long as the connecting parts are not loose. However, when tightening the bolts of the gasket and packing structure, they should be tightened first, symmetrically and evenly, and in turn. After each bolt is tightened, check whether the flange is skewed, and measure whether the gap between the flanges is consistent for correction. Then tighten the bolts symmetrically, with a small amount of tightening, about 1/4 to 1/2 turn each time, until the required pre-tightening force is reached. Special care should be taken not to over-tighten the gasket to avoid crushing the gasket. Generally, it should be tightened until it does not leak. Finally, check the flange gap, the gap should be consistent and maintained above 2mm.
The bolt tightening sequence is shown in the figure.
Assembling and disassembling method of key connection
The key connection forms include flat key, sliding key (guide key), oblique key (wedge key), semicircular key (crescent key) and spline key. The picture shows the assembly form of key connection.
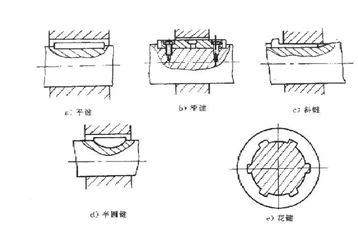
(1) Flat key
Flat keys are more commonly used in valves, and their cross-sectional shapes are square and rectangular. Before assembling the flat key, clean the keyway, trim the edge of the key, repair the size and accuracy of the key, and file the round heads at both ends of the key. When assembling, there should be slight interference on both sides of the key, there should be a gap between the top surface of the key and the hub, and the bottom surface of the key is in contact with the bottom of the shaft keyway. Assemble, tap with a hammer or slowly clamp the flat key with a vise, and fit it into the keyway of the shaft. The copper sheet is used as a pad during assembly to avoid damage to the shaft and key.
When disassembling the flat key, the wheels should be removed first. Use a screwdriver or other tools to pull up at both ends of the flat key. You can also wrap both sides of the flat key with thin copper and pull it out with wire cutters or vise.
(2) Slide key
The feather key is actually a special form of the flat key. It can not only drive the hub to rotate, but also make the shaft and the hub move relative to each other. It is used in the clutch mechanism of the transmission device and the grinder. The feather key can be assembled on the shaft or on the hub. The sliding key and its assembled keyway should be closely matched, without looseness, and fixed with countersunk screws. There should be a certain gap between the sliding key and its opposite sides and top surface of the sliding keyway.
Except for countersunk screws, the assembly and disassembly methods of feather keys are the same as those of flat keys. The countersunk screws should be tightened, not loosened, and should be lower than the surface of the feather key.
⑶ oblique key
The oblique key is similar to the flat key, but its top surface is inclined, with a slope of 1:100, and has a key head for disassembly. When the oblique key is assembled, the edges should be removed, and the matching accuracy between the key and the groove should be repaired; then align the hub and the sleeve with the key groove, insert the oblique key painted with the oblique surface into the groove, check the contact surface, the contact surface should not be less than 70%, If less than 70%, it should be scraped and corrected. Finally, apply a layer of white lead oil on the oblique key and drive the oblique key into the groove. The oblique key removal tools include oblique key puller and oblique key dial.
⑷Half circle key
Half-round keys are used on shafts with smaller diameters and tapered shafts, and can automatically adjust the inclination in the keyway. The method of assembling and disassembling the half-round key is similar to that of the flat key.
⑸ spline
The spline is like a pair of internal and external gears with high machining accuracy and large transmission torque, which is rarely used on valves.